Meet the Teacher: Printables, Ideas, and Tips!


We all know that first impressions are important and Meet the Teacher is no exception! A well thought out and organized meet the teacher gives parents a wonderful first impression and helps reassure them their child will be in good hands.

For meet the teacher, I like to do stations this has parents spread out around the room as they trickle in instead of clustering around 1 area. When parents arrive, I hand them a poem that leads them through the stations.


Next steps
I know how hectic back to school can be and there is a lot of pressure on making a good first impression during meet the teacher. To relieve some of that stress, I have created a product that has EVERYTHING you will need for a successful Meet the Teacher night!

With this pack you can print and go or use many of the editable pages to customize signs, forms, etc. to meet your classroom's needs.

This product includes:
-A parent handout
-Station Signs
-Sign in sheets
-Transportation sheets
-Student information survey
-Teacher information card template
-A family project for students to turn in on the 1st week of school
-Volunteer sign up forms
-Apples for the teacher's wish list
-And several more ideas!

To check out this product, click the image below!


One more tip: During your presentation, encourage parents to sign up for Remind. Remind is an app you can use to text parents (either individually or as a class) without giving out your cellphone number. It saves time, paper, and is a great tool for parent communication!  There is a sheet on the website you can print out with your classroom code on it and you can include that in your folders at station 2 so parents can easily sign up! You can find out more about it here https://www.remind.com/

One more suggestion: Meet the teacher is a time to meet your students and their families, ensure students that you are not a big scary monster, and ensure parents that their child is in great hands and will be getting the best education possible this coming school year. That being said, meet the teacher is also a time to set expectations with both parents and students. While explaining all of the things you are going to do this year, don't forget to take this time to be very clear about what you expect from the students as well the parents.


2

7 Engaging Ways to use Pool Noodles in the Classroom

Right now is the perfect time to stock up on a fun, versatile manipulative for your classroom... POOL NOODLES! Here are the top 7 ways I have found to promote engagement and learning using pool noodles!

Letter ID, Uppercase to Lowercase, and ABC order

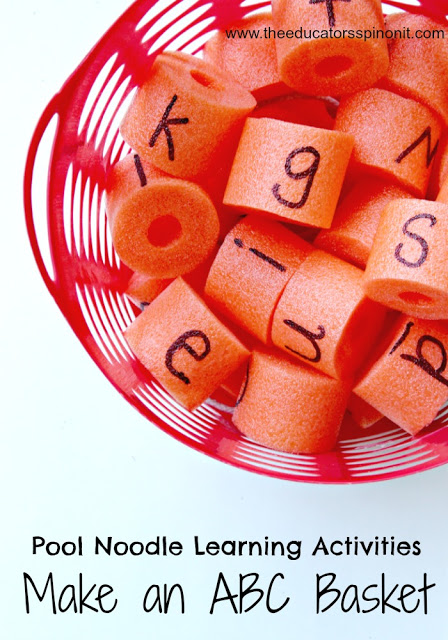
WOW - with just ONE pool noodle? Such a great literacy tool. Make a Pool Noodle Alphabet Basket for Learning Letters


All you have to do is cut your pool noodle into sections and write capital and lowercase letters on them with a permanent marker.
  • To practice matching capital and lowercase letters, students can build towers stacking the capital letter on the lowercase letter.
  • To practice ABC order, students can string pool noodles on a rope in the correct order.
  • To practice letter ID, students can go "fishing" for letters. They can use a skewer, wooden dowel, thick plastic straw, or even a pencil as a rod.  Students will then try and "catch" a letter by putting their rod through the center of a noodle and lifting the letter out of the basket. Finally, students must identify the name of the letter they caught.

Building Words


For this activity, cut 2 different color pool noodles into equal sections. Write several different letters on each pool noodle section (vowels on 1 color, consonants on another) so that students can spin the letters to form new words.


Pool noodle patterns


To do this activity, gather several different colors  pool noodles and cut them into sections. Students can then copy patterns, extend patterns, or create their own patterns by stringing the pool noodle sections onto a rope.

Soring

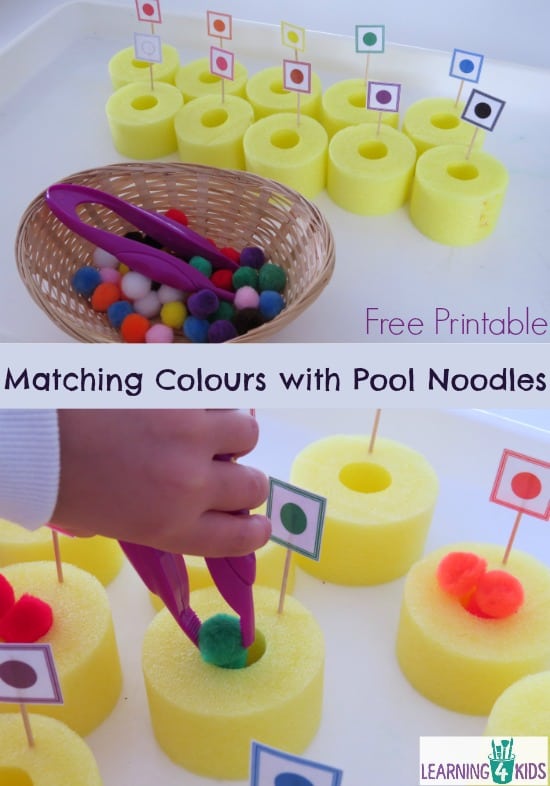
Matching colours with pool noodles - fine motor activity and colour recognition.


To create this activity you will need a pool noodle cut into sections, toothpicks, pompoms, tweezers, and either dot stickers, markers (to color the toothpicks) or the dot printable pictured above (click the word source under the picture to access the printable). Using the tweezers, students can have fun sorting the pompoms into the pool noodle with the cooresponding color. An extension would be to count how many of each color they had or to graph the pompoms by color.


Pool Noodle Catapult


This fun activity only requires 2 pool noodles, a few rubber bands, and a pompom to catapult! Depending on the age and ability level of students, they can either design and build their own catapults or they could help give you ideas and guide you, the teacher, through creating one.

Students can modify the design, make predictions, and test different catapults to see which one makes the pompom fly the furthest. Students could also test catapulting different materials and see which one goes further.

Pool Noodle Structures


1-Engineering STEM Activity for Kids Using Pool Noodles May 20, 2015, 5-23 PM


This STEAM activity is easy to prepare and is always a hit with the kids! All you need are a few pool noodles cut into sections and a box of toothpicks. You can challenge students to build the tallest structure with a set number of pool noodle sections or just let their imaginations run free!

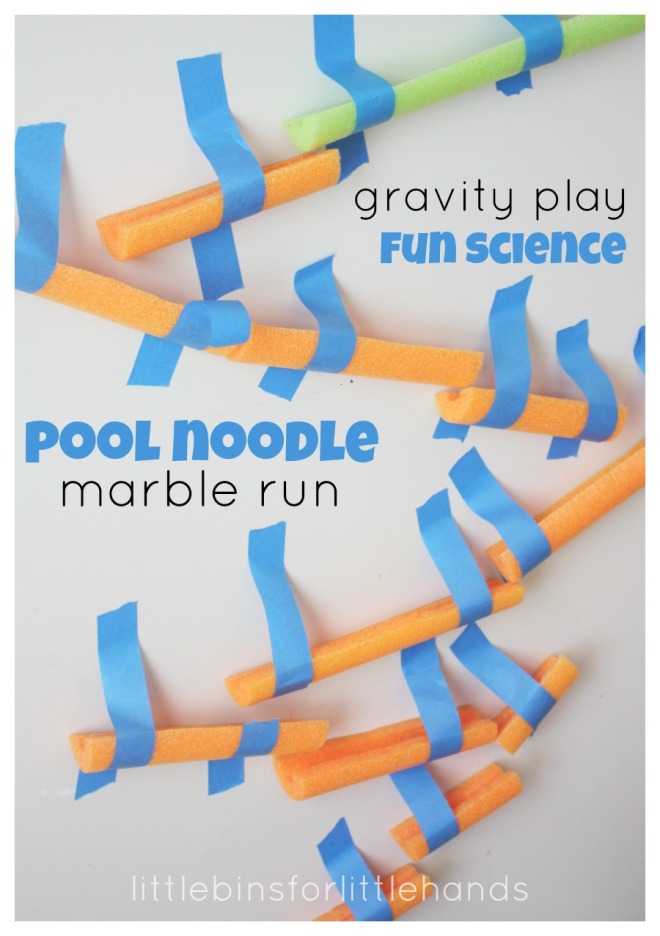
Pool Noodle Marble Run

Pool Noodle Marble Run Gravity Activity

With a marble, a roll of painters tape, and a few pool noodles, students can practice all kinds of problem solving and critical thinking skills! Cut pool noodles into different size sections then cut the sections in half length wise. Challenge students to use a certain number of section, start from a certain height, or see who can build the tallest or longest marble run!

I don't know about you but I cannot wait to hit up Dollar Tree and stock up on pool noodles to try out  these activities in my classroom! Have you ever used pool noodles in your room? Comment below, I would love to hear how!
17

Cheap and Easy End of the Year Gift for Parent Volunteers


Are you looking for a fun yet inexpensive way to show appreciation to parents who have dedicated their time volunteering in your classroom this year?

I have SEVERAL parents that I wanted to thank at the end of the year so I needed something that was cute, simple, and wouldn't break the bank!

My solution...movie night on me!


First, I created this cute FREEBIE tag that you can download here. Then, I bought some Redbox movie codes, wrote them on the tags, and attached the tags to a bag of popcorn! Voila! Instant movie night for a little over $1 a parent!


Now if you are just doing this for 1 or 2 parents and want to go all out, you could even create a whole "movie basket" with popcorn, soda, movie theater candy, etc.


Hope you enjoy the freebie! If you create your own movie themed thank you gift with the tags, I would love to see how you use it! Just tag me @teachglittergrow on Instagram so I can admire your handy work! :)

0

Awards Day

This week we had our big awards day!
On awards day, I invite all of the students' families into the classroom, perform a few poems and a song, watch a slideshow full of pictures taken throughout the year, and of course - hand out awards!

After I welcome all of the families, the students recite this poem:


I looked all over for the original source of this poem and couldn't find it anywhere. We have been saying it for so many years now I have no idea where I originally got it!

Next, the students sing a song. I usually switch the song from year to year but this year, we sang "With my Own Two Hands" by Jack Johnson. If you have never heard it before, it is a great song!!

Finally, the students recite a second poem: The ABC Farewell. This is probably my favorite thing that the students do because each person gets their own part to say and it gives every student a "time to shine"! I am not sure who the original author of this poem is either but here is a cute printable with the words that I found here.


After all of the performances have come to an end, I call the students up one by one to receive their awards.

My kiddos work so hard throughout the year, so I like to give them each several different awards representing all they have accomplished this year!

Here is a little preview of some of the awards I pass out.


If you are interested in using some of these same awards in your classroom, you can find them at my tpt store here. These awards are completely EDITABLE! :)

To save time while handing them out, I place all of the awards the student has earned (I usually limit it to a given number - this year I did 9 per student) in a large envelope and glue this on the front.

This cover is also included in my awards pack.

To close the ceremony out, we take a trip down memory lane and watch a slideshow of pictures throughout the year. A few songs I like to include in my slideshow are:

Good Riddance (Time of Your Life) by Green Day
What a Wonderful World by Louis Armstrong
Count on Me by Bruno Mars
Celebration by Kool and the Gange
Graduation by Vitamin C
You've Got a Friend in Me by Randy Newman
The Climb by Miley Cyrus
My Wish by Rascal Flatts

I also burn a copy of the slide show to give to parents as a keepsake.

Here is our backdrop for awards day


I found some cute graduation "photo booth props" at Walmart (which I forgot to take a picture of before sending them home with kids) so I made this "photo booth" area for kids to take pictures.

Here are all of their goodies to take home after the awards ceremony


Graduation bubbles from the Dollar Tree

I completely forgot to get CD cases for the slide shows (whoops!) but these cute toppers that I found here helped make the baggies I stuck the CDs in much cuter ;)

The ring pop "class rings" are always a huge hit

I also put out some peppermints with this cute sign for the parents.


I cannot believe that awards day has come and gone and that the school year is almost over!

Do you do an awards day or any kind of special ceremony at the end of the year?


2

Read Across America - Dr. Seuss Week!


Read Across America day is on Dr. Seuss's birthday -March 2nd. At our school, we have a Seusstastic week all week long!


Here are a 3 of my favorite activities we have planned for next week.


All Dr. Seuss books are fun to read but I think that "Green Eggs and Ham" has to be my FAVORITE to read out loud to my class! 


There are many activities that we do with this story but the yummiest one has to be making and eating this sweet version of "green eggs". To make this, all you need is pistachio pudding and Nilla wafers (rainbow sprinkles are a fun touch). 

Photo credit: My Little Gems


Another Dr. Seuss favorite is Bartholomew and the Oobleck


After reading, we make our own Oobleck

Oobleck ingredients

1 part water

1.5 to 2 parts cornstarch

Small amount of food coloring (optional)


Mix ingredients

Start with the water in a bowl and add the cornstarch a bit at a time.
Keep stirring until it has a gooey consistency. You may want to use your hands.
When the oobleck is just right, slowly add food coloring, if you want. This can be a challenge to get it mixed properly.
Play with it!


This website has some fun ideas for activities you can do with your Oobleck: http://www.livescience.com/21536-oobleck-recipe.html 


And of course it wouldn't be Dr. Seuss week without reading "The Cat in the Hat"!


After reading, we make these fun "cat in the hat" rhyming hats out of construction paper and sentence strips.


*On the Seussville website, you can get all sorts of free resources to help celebrate Read Across America. (find them here

What kinds of Dr. Seuss activities do you do in your classroom? I would love to see them! Just link up below :) 

LINK UP RULES

1. Your top 3 can be a pictures, a few words, or even a whole paragraph! All I ask is that you stick to this weeks theme. :)
2.  Link back to this site so that other know where to find your fabulous ideas!
3. You can link up your Top 3 Thursday post any day of the week but Thursday will be the most common day.
4. Read at least 2 other posts that have linked up and leave them a little love on their blog!


2

100th Day Hacks - My top 3 tips for a smoother 100th day of school

This week I had hands down the most successful 100th day of school celebration in my classroom to date! 

Like most teachers, how I teach looks a little different from year to year. There are lots of reasons for this and while it  mostly depends on the group of kids I have, learning from past experiences plays a big factor! I keep what works, throw out what doesn't, and try a few new things in between! 

Here are a few things I have learned over the past few years when it comes to  celebrating the 100th day of school! 
I let kids choose how the want to dress. 

Want to hot glue 100 small objects to a t-shit? FABULOUS! Want to dress up like you are 100 years old? HILARIOUS!  I really don't care how they are dressed just as long as they wearing something fun to celebrate the 100th day of school! 

About 2 weeks before the big day, I send home a letter that looks like this: 


(aaaand I just saw that it says 2018! lol Glad all the parents knew what I meant ;/)


I have found that when given a choice, I have had much better participation.


Pony beads instead of cereal necklaces. 

I think students making 100th day necklaces is a great activity! It helps them practice fine motor and they count to 100 twice! (One on a mat and once while stringing the necklace)

So what's not to love you ask? 

I really DO NOT like it when the kids chew on their necklaces all day and are just left with a soaking wet string around their neck at the end of the day. 

If that doesn't bother you then by all means, Fruit Loop it up! But if you are like me, pony beads are pretty cheap, the kids don't put them in their mouth, and they really really like them!! I have lots of kids wear their 100th day necklaces to school for weeks after they made them!


*Bonus hacks for this activity*

 Put out a mat for them to count on (this freebie works great)


TAPE ONE END TO THE TABLE! I cannot stress this enough. If you do not tape the end that the students are not stringing the beads on to the table, they are likely to string on 95 beads before the other end slips off the table and the beads go EVERYWHERE! (voice of experience here) 


It is a FUN day! Learning should definitely still be taking place but make it flexible! 

I always plan WAY more activities on special days like this than the kids can possible get done. I plan lots of fun and engaging stations and have the students rotate through them in about 15 minute increments. Sounds well thought out and organized right? Welllll....

The biggest problem with that is not all 100th day activities are created equal. One student might LOVE the 100 cup challenge while another student can't wait to move on to the 100 pattern blocks. A hat doesn't take the same amount of time to make as trail mix. NOTHING takes as long to make as the 100th day necklaces! 

So here is what I did differently this year and it worked like a charm!


Set up a variety of stations around the room. Brooke Brown's STEM for the 100th Day of School challenge pack has great ideas for hands-on activities for students that is essentially little to no prep for the teacher, and it is FREE! 


On activities you want to make sure everyone gets to (hats, this is me when I am 100, necklaces, trail mix, etc) print off several class lists and put one at each table. As students complete the activity, they can cross their name off the list and move to another station that is open. 


This gives students the freedom of choice, you the freedom to walk around and help those who need it, and most importantly, lets you know who has done what!


*I also made sure to end things about 10 minutes early so that as a class we could clean up the whole room since everyone was EVERYWHERE today!*

Have you already celebrated the 100th day of school? What are some of your favorite activities to do? 


1
Back to Top